Project Description
For this project, we had to design and build three different instruments, a wind instrument, a string instrument and chimes (percussion) instrument. We then had to present the working instruments to the class and describe the physics behind why they worked. I was tasked to build the electric bass with Aditya. We had to design our instruments and create a blueprint with all the notes and wavelengths before we could actually start building our instruments. All the instruments ended up working great.
How Our Instruments Work
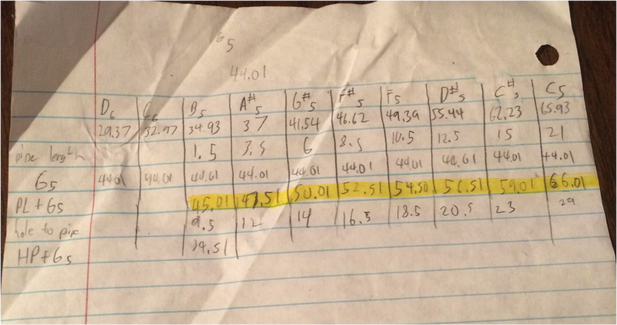
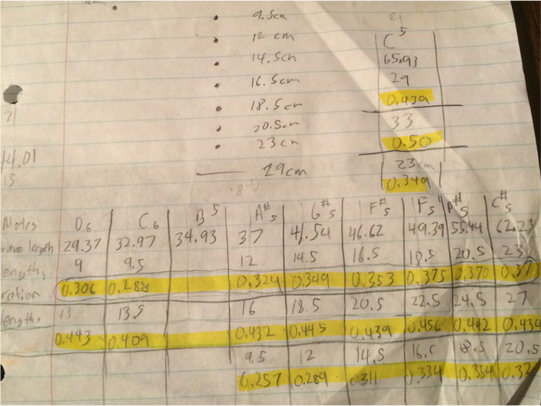
Recorder: Recorders creates sound by splitting and vibrating the air in a tube. By covering holes on the tube it changes the wavelength and note it creates. This change is not linear like in most instruments so there is no equation such as the length of tube is a quarter of the note created like in most wind instruments. To start I played around with a normal recorder then took it apart. A recorder mouthpiece is a whistle. From there I tried to make my a whistle out of wood. That did not work out so I decided to use the top piece of the recorder instead. I then got a piece of pvc pipe and drilled holes into it. I attached the mouthpiece to the pipe and tested it. I had to try at least four other hole arrangements to get the right notes. Below is a picture showing the wavelengths of the notes and the distances between the mouthpiece and hole. There is also ratios between the hole distances and the notes they created.
The highlighted parts are the ratios between hole distance and actual wavelength of the note. The numbers are not consistent. In some in instruments there is a set ratio like a string can create a note that has a wavelength that is twice as long as string. However the distance of the holes do not match up with their wavelengths. The ratios are between 0.3 to 0.5. All the ratios differ even within the same set. So statements like the hole distance length is 0.4 of wavelength of the desired note can not be made. Most wind instrument’s hole distance lengths are a quarter or 0.25 of the note’s wave length. The recorder does not share this similarity with wind instruments.
For this project, we had to design and build three different instruments, a wind instrument, a string instrument and chimes (percussion) instrument. We then had to present the working instruments to the class and describe the physics behind why they worked. I was tasked to build the electric bass with Aditya. We had to design our instruments and create a blueprint with all the notes and wavelengths before we could actually start building our instruments. All the instruments ended up working great.
How Our Instruments Work
Recorder: Recorders creates sound by splitting and vibrating the air in a tube. By covering holes on the tube it changes the wavelength and note it creates. This change is not linear like in most instruments so there is no equation such as the length of tube is a quarter of the note created like in most wind instruments. To start I played around with a normal recorder then took it apart. A recorder mouthpiece is a whistle. From there I tried to make my a whistle out of wood. That did not work out so I decided to use the top piece of the recorder instead. I then got a piece of pvc pipe and drilled holes into it. I attached the mouthpiece to the pipe and tested it. I had to try at least four other hole arrangements to get the right notes. Below is a picture showing the wavelengths of the notes and the distances between the mouthpiece and hole. There is also ratios between the hole distances and the notes they created.
The highlighted parts are the ratios between hole distance and actual wavelength of the note. The numbers are not consistent. In some in instruments there is a set ratio like a string can create a note that has a wavelength that is twice as long as string. However the distance of the holes do not match up with their wavelengths. The ratios are between 0.3 to 0.5. All the ratios differ even within the same set. So statements like the hole distance length is 0.4 of wavelength of the desired note can not be made. Most wind instrument’s hole distance lengths are a quarter or 0.25 of the note’s wave length. The recorder does not share this similarity with wind instruments.
Chimes: The sound created by the chimes is because of the vibration of the chimes. We were tasked to build three musical instruments, and I was assigned to build the chimes. Chimes are typically metal pipes that either hit each other or are hit by some sort of pipe or mallet, causing them to make sound through their vibration. Every material has its own natural frequency, which makes them vibrate differently. To find the right note, it takes a little bit of trial and error, since it is hard to know the natural frequency of objects and then use that to find the right note. Once I had found the note I wanted, I used a website that had all the ratios between the chime lengths and notes, so all I had to do was multiply the length of the chime I had by the ratio to get another chime with a different note. Then, I cut all the pipes to the desired length, and suspended them using screws and rubber bands. Now, when the chimes are hit, they vibrate and create different notes. When the chimes are hit, they vibrate. Sound is a vibration, so when objects vibrate they create sound. There are different notes because different lengths of pipe will create different wavelengths, which means different notes. The shorter the pipe, the higher the note. This is because longer pipes are able to create longer wavelengths because there is more pipe that is vibrating. Longer wavelengths create deeper notes. The vibration of the chime creates compressions and rarefactions in the air, which is how the sound travels to the listener, since sound is a compression wave. In conclusion, when the chimes are hit, they vibrate and produce sound because sound is a vibrations.
Table for Chimes:
Note C4 D4 E4 F4 G4 A4 B4 C5
Wavelength (cm) 131.87 cm 117.48 cm 104.66 cm 98.79 cm 88.01 cm 78.41 cm 69.85 cm 65.93 cm
Frequency (Hz) 261.63 Hz 293.66 Hz 329.62 Hz 349.23 Hz 392.00 Hz 440.00 Hz 493.88 Hz 523.25 Hz
Length of Pipe (cm) 35.30 cm 33.30 cm 31.60 cm 30.60 cm 28.80 cm 27.30 cm 25.80 cm 24.90 cm
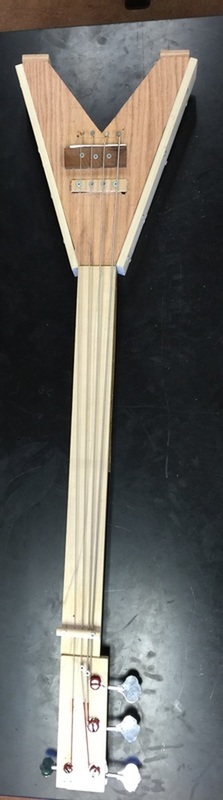
Electric Bass: Typically, most string instruments such as a guitar or a bass rely on the vibrations produced by plucking the string to generate the noise. For our specific bass, we decided to make it electric by adding a pickup to it to amplify the sound instead of going for an acoustic guitar or bass. The way that the pickup works is that it consists of a coil of copper wire wrapped around screws approximately 9000 to 18000 times, and magnets are placed on top of the pickup, creating its own electromagnetic field near the bass strings. When Ashok plucks the string, it vibrates within the pickup’s electromagnetic field, and the disturbance creates a vibrating current within the copper coils of the pickup. This current is sent to the amp, via the jack, as electrical energy, and allows the amplifier to increase the volume and clarity of the bass string by a large amount. As for the way that we generate the different notes with the bass, if the lengths of the string is changed or if the tension of the string is changed, then a vibration of a different frequency is produced. Along with these factors, there is a third factor that determines the wavelength of the note produced, and that it the thickness of the string and the material that you are using as your strings. For example, a thin fishing line will produce a much higher note than the note produced by a thick copper-halfwound string, and this is mainly because the thicker strings tend to have more mass and vibrate much slower, producing a lower, deeper note, and each material has its own natural frequency, with metal tending to have a lower natural frequency. When a musician plays the guitar, they press down at certain points along the known as the frets, and when they do so, they are decreasing the distance over which the string can vibrate, thereby increasing the frequency of the sound produced and changing the note. The length of our strings were all the same, being 32”, so instead of having our open notes be determined by length, we made different open notes by varying the tension of the string and the thickness of the material. Our thickest string produces an open note of E1, then the next is A2, then D3, and finally G4. If we had used the same material and the same tension, then we would have changed the lengths of each string since the length of the string is half of the wavelength of a specific note. The reason for this is because the length of the entire string is only moving up or down at one given point, so essentially, the entire string has to go up then down to complete one wave, which is why the length of the string is almost always half of the wavelength. Our electric bass doesn’t follow this rule, because our variables are string tension and thickness. This allows us to hit the lower notes without having an incredibly long string. The looser and thicker the string, the lower the note.
Table for Bass:
Note E1 A2 D3 G4
Wavelength 837.31 cm 313.64 cm 234.96 cm 88.01 cm
Frequency 41.20 Hz 110.00 Hz 146.83 Hz 392.00 Hz
String Length 81 cm 81cm 81cm 81 cm
Concepts
Wavelength (λ): the distance of one full wave; example- crest to crest
Frequency (f): number of waves or vibrations in a unit of time
Period (T): time between waves/ vibrations (time for one λ to pass)
Wave Speed (V): rate at which a wave travels
Amplitude (A): displacement from equilibrium to crest I a wave
Transverse Wave: moves up and down as it travels forward
Longitudinal Wave: compresses and expands as it moves forward
Crest: high point in a wave
Trough: low point in a wave
Equilibrium: mid line of a wave
Velocity: speed of a wave
Electromagnet: A type of magnet in which the magnetic field is produced by an electric current running through something such as copper wire. In this case, the electromagnet was created by the copper wire coiled around the screws of the pickup, which was connected to the bass amp.
Reflection
I was very excited to do this project from the first day of the year. This is because I play the electric bass, guitar, and drums. Our group was very successful in making our instruments because they all worked great. We put a lot of time and effort which made me feel accomplished. I was assigned to make the bass with Aditya and were able to get it to moderately work. The highlight of this project was definitely the electric bass because it took the most time and effort to make and it looked beautiful. Our strategy was to divide and conquer. Everyone in the group was assigned an instrument and it worked extremely well because we were able to get all the instruments done. One peak of the project was that we were able to successfully build the bass. Since the bass was electric, there were a few more things we had to learn like how pickups work. The bass looked great which was one of the things I really wanted. The pickups didn't work the first time we made them because we didn't coil the copper wire enough times, so we coiled it even more and now the amp makes a very quiet noise. Our second peak of the project was that everyone in our group knew information about all the instruments. For example, I could ask Nathan or Andre about how the pickups work and they would give me a complete and correct answer. This goes back to why we did so well on the presentation. Our first pit was once again time management. This project was one of the shorter ones that asked for a lot. We focused so much on how the bass looked and the aesthetics of that we didn't even start building it until a week into the project. This was very concerning because at this time, some groups were half way done with their string instruments. This is when we knew we had to step it up so we nailed through everything as fast as we can. We worked on our bass at any time we can get. We came in at every lunch and Aditya even stayed after school for hours. The second pit was that when we first started building the instrument, I didn't really know much about the recorder and chimes because our strategy was to split up and work on our own instruments. At then end everyone ended up knowing everyone's instruments extremely well because we just read the justification document. One thing I learned in this project was how to make a pickup. I had no idea on how a pickup worked either, until we made one. Another thing I learned was how to play a bass without having frets. This was actually the first time I played a bass without frets and I was really good at it because I am so used to playing the bass with frets, I already know where all the frets approximately are. This was my second favorite project because the outdoor classroom was my first. I liked this project a lot because I was the only one other than Andre musically inclined. This helped in being a leader and I had fun doing that.
I was very excited to do this project from the first day of the year. This is because I play the electric bass, guitar, and drums. Our group was very successful in making our instruments because they all worked great. We put a lot of time and effort which made me feel accomplished. I was assigned to make the bass with Aditya and were able to get it to moderately work. The highlight of this project was definitely the electric bass because it took the most time and effort to make and it looked beautiful. Our strategy was to divide and conquer. Everyone in the group was assigned an instrument and it worked extremely well because we were able to get all the instruments done. One peak of the project was that we were able to successfully build the bass. Since the bass was electric, there were a few more things we had to learn like how pickups work. The bass looked great which was one of the things I really wanted. The pickups didn't work the first time we made them because we didn't coil the copper wire enough times, so we coiled it even more and now the amp makes a very quiet noise. Our second peak of the project was that everyone in our group knew information about all the instruments. For example, I could ask Nathan or Andre about how the pickups work and they would give me a complete and correct answer. This goes back to why we did so well on the presentation. Our first pit was once again time management. This project was one of the shorter ones that asked for a lot. We focused so much on how the bass looked and the aesthetics of that we didn't even start building it until a week into the project. This was very concerning because at this time, some groups were half way done with their string instruments. This is when we knew we had to step it up so we nailed through everything as fast as we can. We worked on our bass at any time we can get. We came in at every lunch and Aditya even stayed after school for hours. The second pit was that when we first started building the instrument, I didn't really know much about the recorder and chimes because our strategy was to split up and work on our own instruments. At then end everyone ended up knowing everyone's instruments extremely well because we just read the justification document. One thing I learned in this project was how to make a pickup. I had no idea on how a pickup worked either, until we made one. Another thing I learned was how to play a bass without having frets. This was actually the first time I played a bass without frets and I was really good at it because I am so used to playing the bass with frets, I already know where all the frets approximately are. This was my second favorite project because the outdoor classroom was my first. I liked this project a lot because I was the only one other than Andre musically inclined. This helped in being a leader and I had fun doing that.
